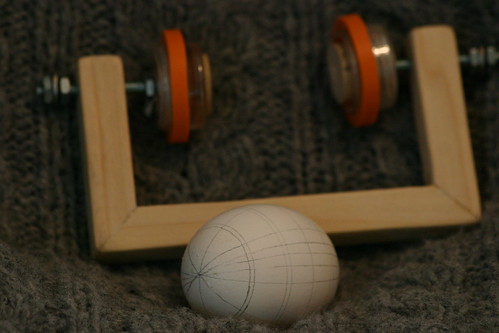
merry christmas to me! my thoughtful and resourceful husband made this egg lathe as a gift for me. now (when i find the time again) i can make super-straight divisions on my pysanky. i can hardly wait to give it a try on a real egg (this was just a test, as we're away from my egg supplies right now). check out those closely-spaced parallel lines! and the coolest part is that unlike many egg lathes, it works for vertical divisions as well as horizontal ones. neat.
true to form, he made it from random objects found around the house, but yet you can hardly tell it's repurposed unless you really inspect it. this uses a synthetic wine cork, plastic rings from target pharmacy bottles, and a little acrylic make-up pot as well as wood and hardware. (it needs a few finishing touches yet, because he was waiting to get some input from me.)
thanks, larry! now i'm feeling a bit sad that you are nearly the only exception in my "all handmade christmas" plan. (though you seem to be enjoying your kindle just fine. that, and the added gift of a slightly less-crazed wife who was not trying madly to finish yet one more gift in time for christmas. :)
more on handmade christmas as i find the time to post -- i've been making a ton of gifts the past few months but couldn't post many of them lest i spoil the surprise. so now i'll catch up.
Saturday, December 27, 2008
egg lathe
Saturday, December 20, 2008
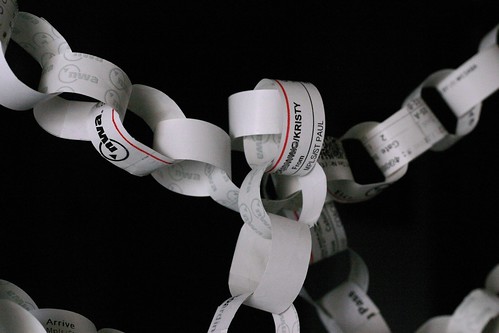
delayed holiday traveler boarding pass paper chain
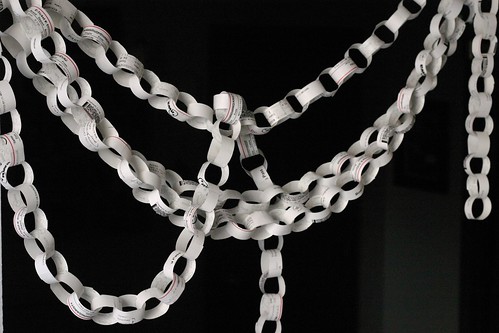
not much of a craft, but i thought i'd share...
our flight was canceled in minneapolis on thursday (the best part being that the flight just disappeared from the screen without explanation, and no one even came to talk to us for 20 minutes. stay classy, northwest airlines.) (okay, the other best part was that i was sick, larry had zero sleep since we had to get up at 4 a.m., and we had two kids along for the ride.)
throughout the day, as we waited standby on various flights for 8 hours before finally making it on board, we were handed more and more sets of boarding passes. my ticket envelope ultimately held quite a thick stack of papers -- so i decided to turn a holiday inconvenience into holiday cheer! it's now a lovely paper chain adorning our doorway.
and to VPI student amanda who was attempting to make her way to glendive, MT... i hope you found your way eventually. i felt so sad for you as my family boarded off the standby list, leaving you and 27 others to yet another round of waiting.
kid craft: felt ornaments
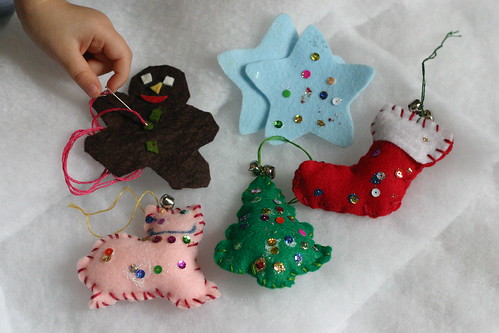
eva made these ornaments for her cousins and such this year. i traced cookie cutters (mostly in a holiday theme, if you count the Holiday Cat, right?) and cut them out for her. well, she cut out the gingerbread man herself, which is how we discovered that kid scissors don't really work on wool felt, and i was fearing for the safety of that useful bit of skin between one's thumb and hand when helping her with the kitchen scissors.
she then decorated with glitter glue and sequins, sewed around the outside, and stuffed them. together, we added a hanging loop and a few jingle bells. [i will caution that once stuffed, the glued-on sequins tend to pop off easily, so beware if your ornament will be going to a household with a little one -- or use stronger glue, or stitch down the sequins?]
the nice thing is that you can customize this project to suit the needs of your kid -- or even make it work for several kids of different ages. an older kid can trace, cut, decorate, sew and stuff themselves, and a younger sibling might just do the decorating part.
my other discovery with this project: i came across some very inexpensive craft felt from the kunin group that is made of ecofi (or ecospun), which is made from 100% post-consumer recycled plastic bottles. hurray! that assuages my slight guilt of not letting eva have at my brand-new wool felt stash and giving her synthetic instead. :)
[warning: rant ahead..]
oh, and i found this felt at joann's -- why oh why, i ask myself, was i at joann's yet again, despite my oft-sworn (and occasionally shouted out for the benefit of other customers) oath that i Will Never Shop Here Again. *sigh* i really have issues with that place, their staffing policies designed to keep a minimum of 5 people in line at the cutting table *and* the check-out counter, their deceptive pricing, and on and on. but yet, i find myself there because it's closest to my house and adjacent to the grocery store, and i'm loathe to drag two kids in and out of car seats an extra time if i don't have to. despite the location, though, i would probably still save time if i drove across town and went to a real craft store. do other people have this problem at joann's, or is it just my local store? (well, i know i'm not the *only* one -- this woman received the worst customer service ever there.) [sorry, end rant. wow, calm down, there, grinchy...]
ahem.. where was i? yes, this project is perfect for little holiday gifts for your kid's friends, teachers, grandparents, etc. easy, inexpensive, green(ish), and makes for a fun afternoon. yup, those are pretty much all the criteria.
Tuesday, November 25, 2008
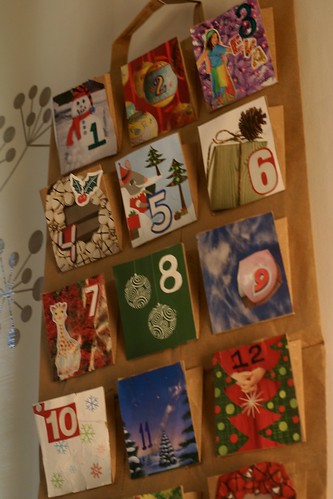
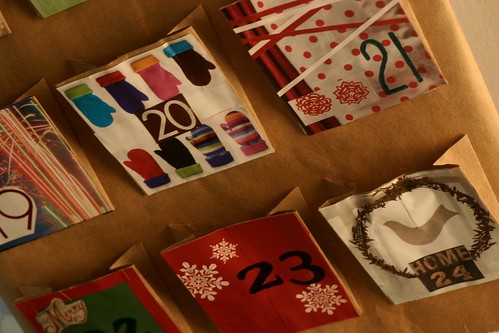
recycle bin advent calendar

it may sound silly, but i was recently freaking out about advent calendars. i'd say it officially kept me awake at night (once). i wanted to make just the right kind, something we'd keep and use year after year -- but i didn't have the time to make the sort of thing i had in mind. i meant to start on it this past summer, but then -- oh yeah -- i went and had a baby. i guess that took some of my free time.
but then i was filtering through the dozens and dozens of catalogs in our stack of mail that was held during our recent month away... and i knew just what to do. i decided we'd make an advent calendar entirely from the recycle bin (okay. plus some glue and tape). bonuses: 1. eva gets to help make it. turns out she's a whiz kid at cutting out squares. 2. it's cheap. 3. it's green. 4. it can be completed in fewer than four months.
i bought a rosemary topiary (shaped like a baby-sized christmas tree), and i've chosen to fill our advent calendar with tiny ornaments for our "tree". (what? no chocolate? i'm catching flack from everyone about that... everyone but my kid, that is, because she doesn't know what she's missing.) i'm making tiny ornaments out of scraps of things we have around, like a pipe cleaner candy cane, a peanut shell painted sliver, some jingle bells, craft pompoms strung on a twist-tie to make a little wreath, cardboard star covered with scraps of foil, etc. i've only made seven or so thus far, but i like that i only have to stay a few days ahead, and can complete the rest at my leisure. :)
so here you go, a mini tutorial of how we made our advent calendar. sorry, no photos of the process itself, but it's not terribly difficult. (in fact, sorry for the state of these photos in general -- the camera fell off the roof of a car on a mountain highway a few months ago, and the various rubber bands and wedges of paper are no longer sufficient to keep it working... it's no longer able to focus, manually or otherwise. hmm... guess what we're buying each other for christmas?)
supplies & tools
catalogs/magazines
2-3 brown paper grocery bags (one with handles if possible)
ad circulars/newspaper inserts (optional)
glue/tape
scissors
a holiday-obsessed preschooler, if you have one handy
1. collect and peruse catalogs
unless you're conscientious like my mother and have called the 800-number of every company that sends you junk mail to get off their mailing list, you probably have stacks of catalogs and magazines arriving in your mailbox this time of year. rip out images you think might be useful -- beyond the obvious holiday and winter scenes, look for areas of solid colors interesting backgrounds. (most of my pockets are decorated collage-styls, even when it may look like a single image -- a person has to get creative to cover up ad copy. :)
2. find those ad circulars in your recycle bin
you need numbers. large numbers! catalogs are far too tasteful to list their prices in giant yellow 48-point font -- so you'll have to look in the ad inserts. these show up in my mailbox, or if you get the newspaper, that would be helpful. cut out all the numbers you think you'll need, but don't stress that nothing seems to cost $17.23... you may have to hand write the 17 and 23 (but i promise you'll find endless options for the 9).
3. create the backing of the calendar
to make the backing, you need to open up a brown bag (the one with a handle if you have it) into a long strip. cut down the two narrow sides of the bag, veering out to the corners at the bottom (basically, just cut along the upside-down Y-shaped fold lines on the side panels). flatten bag with "wrong"/printed side facing up. roll the side flaps until they are hidden on the back of the bag and tape in place. you can choose to cut them off or simply fold & glue them to the back, but i found rolling them provides more structural support along the sides, allowing the advent calendar to hold more weight without bowing and bending. cut a strip from another bag, roll it up, and tape it along the top edge of your calendar to create additional reinforcement there. if your bag has handles, you can remove the one from the bottom if you like.

4. cut dozens of pockets (two dozens, to be exact)
next you need to cut out 24 pockets from the additional brown bags. i made my pockets 3" wide and 3.25" tall because that's what fit on the paper bag i had (8 rows of three), but you can adjust this as needed. i found triangular-shaped gussets on the sides of the pockets allowed larger items to sit comfortably inside -- to form these, i flared out at a 30 degree angle from the bottom corner of the pockets (see template -- you can eyeball this if your protractor isn't handy). don't forget those flaps around each side which allow it to be glued in place. cut out one pocket the way you like it, then trace and cut the rest. (i stacked & cut five layers of brown paper at once to speed this up.)
5. prefold the pockets
it will make your life easier if you prefold your pockets before decorating them. to do this, cut a piece of cardstock (magazine reply cards are perfect for this) the size of your finished pocket. lay it in position over one of your pocket pieces, then fold against the cardstock template. (this is much faster than tracing lines in place then carefully folding each one.) then fold up the gluing flaps, and finally fold each gusset into place behind the pocket (along the dotted line in my template).
6. decorate your pockets
now the fun part! decorate the pockets with the pieces you tore out of the catalogs. tip: find that piece of cardstock you used to help you fold the pockets. place it behind an image you plan to use and hold this up to the light. position it where you like, then trace around the cardstock and cut out the image for a fast way to get pieces just the right size. add more images until you're happy.
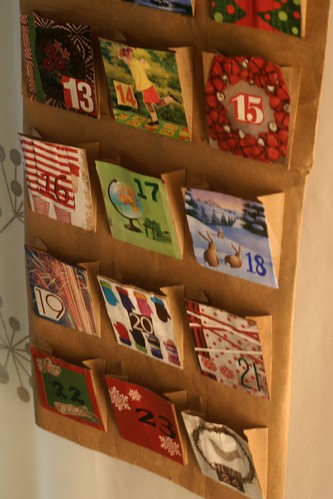
eva had a grand time helping me with this part, doing much of the cutting and a bit of the gluing. she selected images i never would have thought of (like the hopscotch girl, or the flowered rug). and surprise, surprise -- the whole project was more fun and the end result is far more special because i followed her lead rather thank staying overly invested in a picture-perfect result (see? i'm learning, slowly but surely...)
7. number away...
arrange the pockets on your calendar backing the way you like before adding numbers -- this way you can find an arrangement you're happy with. add the cut-out numbers you found, or hand-draw numbers, or both.
8. glue and tape pockets in place
i found it worked to use tape for the sides of the pockets (where the tape could be hidden inside the pockets) but glue for the bottom edges (where tape would show).
9. fill and enjoy
hang up your calendar by the handle (if it has one), and fill with whatever you like. if you're worried about a wee one sneaking ahead a bit, you can secure the filled pockets closed with decorative stickers or tape. or just hang it really high up on the wall.
i can't even describe how excited my three-year-old is about her advent calendar. and it has a very practical purpose as well -- i don't have to try to answer "when will it be christmas?" on an hourly basis. now, just daily. :)
and maybe next year i'll create the heirloom advent calendar i seem to think i should be making... or maybe this is it? as eva would say, "we'll just have to wait and see."
Tuesday, November 4, 2008
cindy lou who & the grinch
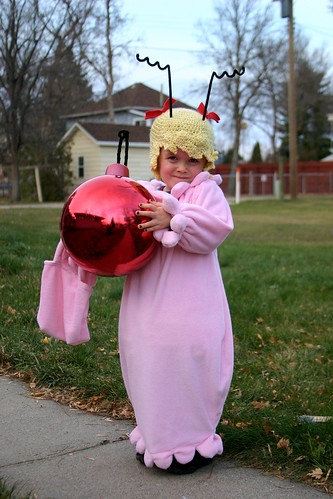

sometime in february, several months and a hundred or so readings into "how the grinch stole christmas", i told eva that if she still loved cindy lou who that much when it got to be halloween, that i would make her a cindy lou who costume. she was thrilled. shortly after hazel was born, she suggested that she could be the grinch. and somehow or other, baby cousin lilly ended up as max the dog.
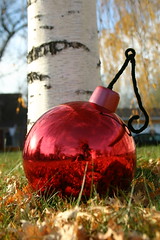
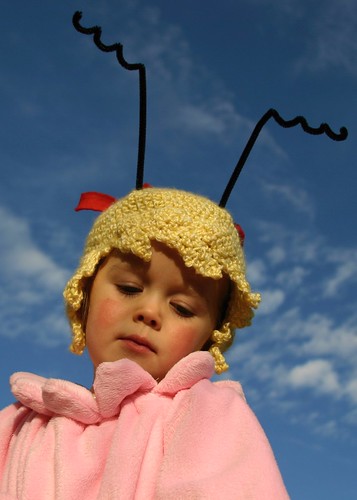
the cindy lou who costume consisted of a wig hat, a pink dress, and a giant christmas ball.
the pink dress was made of pink costume fur -- for added warmth, since we're visiting in the north for halloween, and there's nothing worse for a kid than being forced to wear a winter coat over one's costume. the dress is loosely based on a pattern for a nightgown with a raglan sleeve (butterick #4910). i added scallops at the neck, sleeve, and hem, and stuffed them with scrap fabric to make them cartoonishly puffy. the hem was tapered, but i couldn't taper it in completely around her feet, obviously. i fashioned what amounts to a puffy apron to tie around her waist under the dress to add to the effect by widening the dress around her middle.
the wig hat (as i've come to call it) is crocheted out of bernat glow in the dark yellow yarn. i thought i was worth a try -- and especially for halloween -- but i'm not overly impressed. the yarn has a pretty awful texture, and you can't discern much of a glow, unless you charge it up directly under a light then immediately head to a very dark room. but, it was enough to entertain her, so i guess it was worth it. i basically shaped a regular crocheted hat, then added extra rows down the back to make it approximate her hairline. i made separate triangular pieces that i attached around the front hairline to look like locks of hair, and added a few chains of stitches to fill it out. cindy lou who has little red hair bows, and as the last fun detail, squiggly seuss-style antennae. i formed one pipe cleaner (ahem, excuse me, they're now known as "chenille stems") in to a circle, then attached the antennae and poked them through the wig from the underneath. they stayed standing upright perfectly with this method.
the red ball... well, we were planning to make one from scratch, but happily, we found a giant novelty (shatterproof) christmas bulb at a local home improvement store. hurray for the christmas creep that puts christmas decorations within my grasp prior to halloween! (eek.) all i had to do was add the little topper part and the seussian hook. that consisted of a painted small plastic food storage container and more pipe cleaners.


and for the grinch... oh, the grinch. you can't very well paint a baby's face green, nor can you give her green furry gloves that she'll just eat. so as a result, she mostly looked like a tiny somewhat demented christmas elf, i'd say. but, whatever it was, it was plenty cute. the coat was a tiny, shorter version of the same basic pattern i used for the cindy dress. the hat and shoes were just quickly mocked up, and on the third try, i actually made the shoes big enough for my baby's chubby feet and ankles!
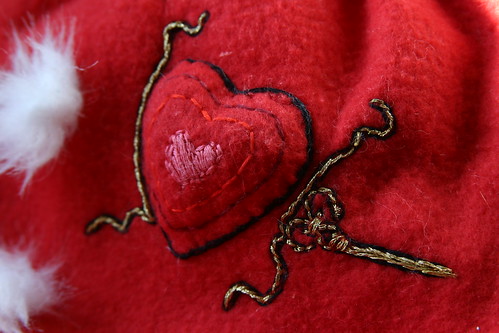
to minimize future angst along the lines of "oh sure, i had to be the grinch for my first halloween!", i was sure to make her the happy grinch from the end of the story, the one after his heart grew three sizes. thus the embroidered detail of the heart that grew so big that it broke right through the fancy gold measuring device (i based this off a screen shot from the movie).
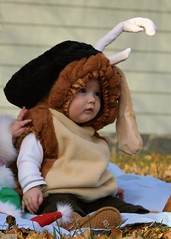

and speaking of future therapy bills, my baby niece lilly looked very cute as max the dog. my sister bought her a dog costume, and i fashioned a reindeer horn (with what inside? more pipe cleaners, of course!).
like usual, i went a little more nuts than i intended. but i will always make my kids homemade halloween costumes, for as long as they want me to do so. eva was so very pleased, her face just lit up when she finally saw the completed costume. (though not so much in the photo below... this was taken the day after, when the sugar high had dissolved into a massive cranky sugar crash. :)
Thursday, October 23, 2008
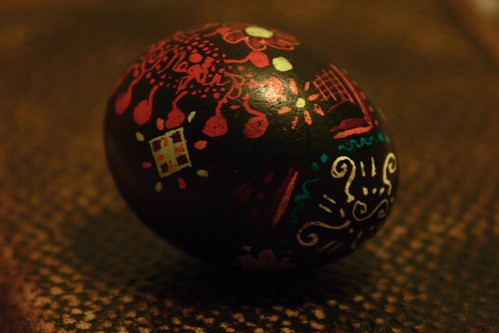
maker faire community egg
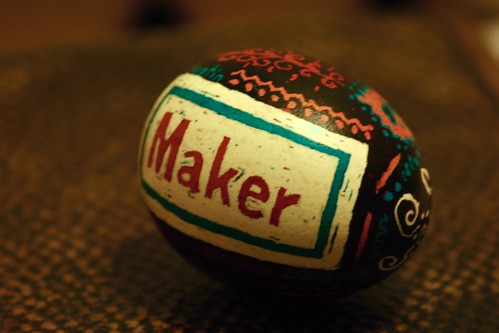
Maker Faire has come and gone, and though it took some feats of organization to be there along with a preschooler and a nursing baby for two big days, it was totally worth it. I was so happy to have the chance to share one of my crafts, making pysanky (Ukrainian eggs), with so many great people. Everyone was so friendly, and I loved getting to meet so many crafters from Austin and beyond.
And speaking of that, thanks to Rachel for making me one of her "editor's picks" among the craft makers. I didn't get as much opportunity to spend time looking around as I might have liked, but from the little I saw, I was thoroughly impressed (and am still in awe of the lace-making... hmm, I'm tempted... but do I need a whole new project?)
I helped about three dozen people make eggs of their own to take home, and several people seemed especially taken with the craft. (Oh, and for everyone who is attempting to remove the wax from their eggs at home: I said to use an oven on the lowest setting with the door propped open -- oops! That applies to eggs that have been blown out -- for whole eggs, you need a bit more heat. Sorry for any frustration I may have inadvertently caused... :)
I also had people add to the community egg (shown above). I liked the idea of an egg that was created by many hands, and it also gave people the chance to try it out even if they didn't have time to sit down and make a whole egg.
If anyone I met at Maker Faire has any questions, please feel free to post them here and I'll be sure to answer.
And I promise, we'll return to something other than eggs now... :)
Monday, October 13, 2008
maker faire // nest egg

maker faire is this weekend, so if you'll be in the austin area (or can grab your hobo stick and hop a train to get here?) come check it out, and be sure to stop by and say hi. i'll be there with my pysanky, which means i've been working on eggs all this week.
above is the final egg in a series of eggs i made to show the steps in the process (thus the simple design; i needed to repeat it five times). given current events, i felt motivated to make a graph of the dow jones industrial average across my entire lifetime so far. in egg form. (it's pretty accurate, too.) seeing the graph that way makes it pretty clear...that whole exponential growth thing had to break sometime, huh? the egg is pictured atop the contents of eva's piggy bank (which includes five different currencies... hey, does that mean we're safe?). nest egg, indeed.
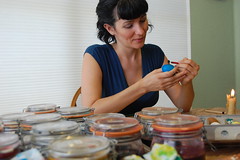
(bonus points if you spot all the currencies... :)
Saturday, October 11, 2008
ghosts of halloween past
the one i'm most proud of is the evil knievel costume i made for larry a few years back. i based it on a commercial pattern for an elvis costume, but added the red white and blue trim (stars! oh the stars!), a belt, and a detachable cape.
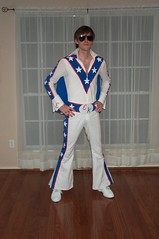
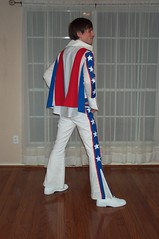
i put more time into it than one logically should put into a halloween constume, but once a decade or so, i think that's okay. as a result, my costume that year was a more or less no-sew project. i made a mummy bride quickly by "draping" shredded fabric over my wedding petticoat, pinning, and basting in place. the bodice is more or less tied on, and the gloves and veil are cheesecloth (in december when i wanted cheesecloth to mull some cider, i couldn't figure out what happened to the full package i knew i had just bought...oh yeah. :)

(forgive the poor photo, this was several years ago...)
my sister lora and her friends are crazy about halloween. (no, really. cra-zeee.) they've done "dukes of hazzard" with tiny little cars, all the shrek characters (i think that damn cat took forever). here are a few others -- click through any photo for more info, or feel free to post a comment if want more details:
the lollipop guild (with a movie photo for reference):


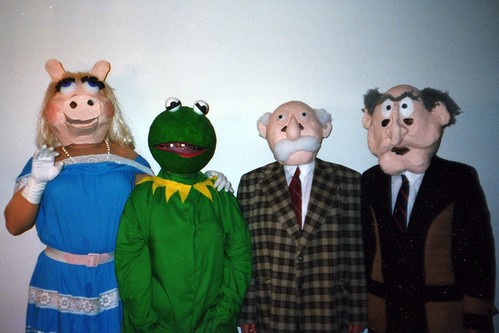
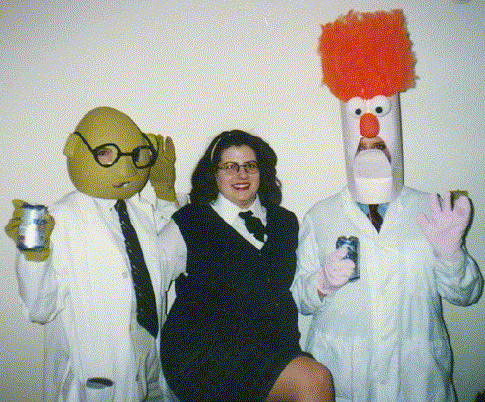
various muppets, including statler and waldorf (the old guys from the balcony), kermit the frog and miss piggy, and beaker and bunsen (shown with a friend of theirs dressed as mary catherine gallagher):
the princess bride:
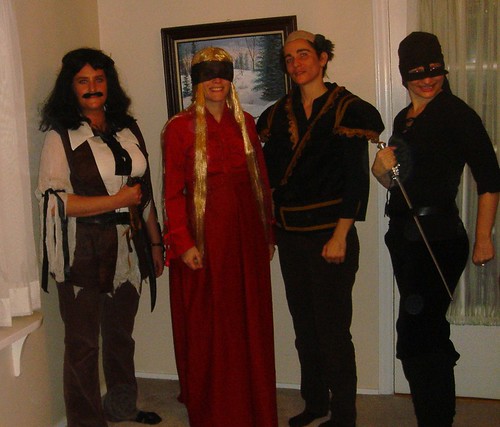

oops, looks like we got the blindfold color wrong. well, i think it's also a break from complete accuracy that our princess bride was noticeably pregnant. (hmm, i don't remember that plot twist from the movie. :)
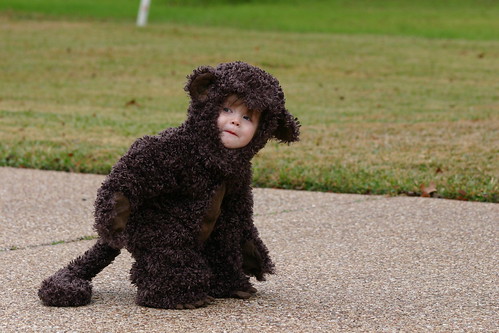
and my other favorite, the monkey costume i made for eva two years ago. she wore it for two years, because i intentionally made it large enough and basted it up the first year. she was so cute, and convincing enough that it made all the neighborhood dogs bark like crazy. :)
this year, though, she's old enough to choose for herself. and sometime around february, based on her ongoing obsession, she choose cindy lou who ("who was not more than two") from the grinch. we're making it a theme, and the babies in her life (sister, cousin) will be the grinch and max the dog, and any participating grown-ups will be the whos from whoville. check back after halloween for that update.
Monday, September 29, 2008
plastic bag pompoms

I'm not exactly the cheerleader type. I was once a cheerleader, though -- in sixth grade, my first year in a new town, I (along with every other girl in the class save one) tried out for next year's jr. high squad. Unfortunately for me, my cheering older sister had taught me enough that I made the squad, only to find that it just wasn't my thing. I think I ended up feigning illness many Saturdays, and the squad alternate ended up cheering more games than I did. (Granted, that wasn't a terribly mature way to handle the situation... but that's kind of the definition of being in seventh grade, I think.)
Well, my daughter saw pompoms on TV, and declared that she wanted some. "How do you even know what pompoms are?" "That's just what they're called, Mom. They're pompoms." Hmm. So much for that whole plan of not indoctrinating her with immutable gender roles. Pompoms it is!
Rather than go pick some up at Target -- where they would assuredly be bright pink with pink on top and emblazoned with some distasteful licensed character -- I decided to make our own out of Target bags. That's what I had on hand (Gimme a "T"! Gimme an "A"! Gimme an "R"!...), but I think this would be really cool with some solid colored bags if you could get your hands on them. (Just last week I had a red one lying around, too bad we decided to clean up! Lesson learned. :) Here's how we did it, but I'm sure this method could be adapted in any number of ways. See what you come up with...
Materials: 7 plastic bags (for a pair of pompoms), a rotary cutter/mat/straight edge set or a scissors. That's it. You don't even need tape or a ruler.


Tuesday, September 23, 2008
t-shirt bag
i've vowed several times in the past many years to stay away from cheap disposable one-season clothing and focus on quality, timeless pieces. well, i try, but it's been a struggle lately, and somehow an embarrassingly high percentage of my wardrobe comes from target (hey, did you know you can just wheel that whole damn cart right into the dressing room, toddler and all? that's on a good day. most of the time, i just pull things off the rack, try them on at home so i don't have to do it while juggling kids, and return what doesn't fit. lame. you can imagine how well this plan is working for me.)
well, i have big plans. i've been holding off until my body figures out what size it wants to be post-baby, but shortly i plan to equip myself with, say a minimum of two pairs of pants that fit (up from my current total of zero -- it's summer, i've been relying on those roughly three skirts i have. seriously sad.) this time around, i really want to commit to avoiding disposable clothing. i'm sticking to timeless styles, remaking old stuff i have around or that i find resale, or sewing. eek! i've always wanted to have a wardrobe of clothing i've sewn, and have never managed more than a few pieces at a time. of course, now i have less time than ever... so i think i may have to ease into this, but stating the goal is a good a place to start as any.
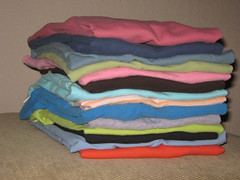
so, in an effort to clear out some room in my closet, i pulled down a whole stack of t-shirts that are all from 2004 or earlier. remember? back when we were made to believe that it was hopelessly frumpy if the hem of our t-shirts so much as grazed the tops of our jeans? well, i saved all my t-shirts then when i switched into maternity clothes, thinking i'd wear them again some day. i'm pleased that i've more or less fit back into them since then, but lo and behold, they're... short. now it's really important that our t-shirts not only sit squarely below the tops of our jeans, but it's ideal if they extend nearly to the thigh. perfect. and, unlike the hemlines of my mother's day, i can't just raise or lower my t-shirts so that i can keep wearing them. you would have thought t-shirts were more or less a basic item, not so affected by the whims of fashion. but were that so, how else would they get us to buy all new t-shirts every two years?
lesson learned. that's why i'm not playing that game anymore (as best i can avoid it, in any case.)
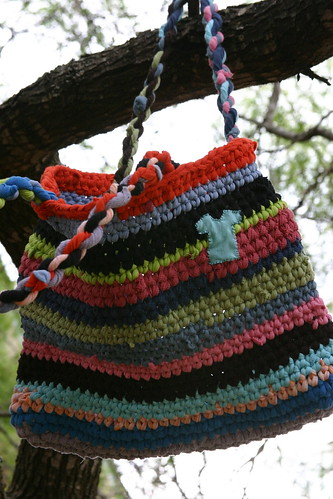
all this to say that i used laughing purple goldfish design's strip cutting technique to attack those short t-shirts, and while i was over there, got inspired by her crochet bags. i will say, i didn't bother with the pattern (too lazy to walk over to the computer and remind myself what it was, though i would have been better off if i had), so mine is just made up. luckily, it's the sort of thing you can make up while sitting on the floor attempting to have a conversation with an old friend, as two babies and two kids swirl around the room (we had house guests this weekend, which was really too much fun.)
a few details: i cut the strips 1 inch wide (might go narrower next time?), and used a N hook. (i'd read the metric size for you off said hook, but my daughter took a liking to its novelty-like giant goofiness and now it's somewhere among her things, i'd guess.) i did it single "strand", which kept the colors distinct and formed a stripe pattern (so to speak), but using thinner strips and crocheting double-strand would give a different look if you like. the handles were a twisted rope sort of thing formed by the loops cut off the bottoms of the shirts (to avoid having to deal with the thicker hemmed fabric). i opted not to line it since it's so stretchy, i wanted to go with that rather than work against it with a lining. also, it's heavy. really heavy. just something to keep in mind.
so there you have it. my too-short shirts have become a just-right-sized bag. i like how the colors worked out, but really it's not that surprising. after all, i did choose all those shirts once upon a time. really, the surprising part is that it's not all just shades of green.
crochet toddler dress
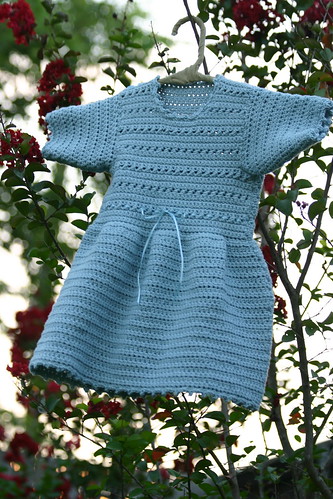
two months ago, i decided to crochet something for hazel. i settled on a sweet timeless looking dress pattern from a book i have around (candy crochet by candi jensen, the pattern is "summer love"). i really want to just make up my own stuff, which i will do next, but i figured i'd try not to tax my recently-postpartum brain for now. similarly, i made it 18 mo size so that if it took me a long time to complete, there would be no chance she'd outgrow it before it was completed.
plus -- and i really believe this -- 'tis better to make clothing for toddlers than for babies. babies grow ridiculously fast, and ideally you'll want them to wear it for more total hours than the number of hours you spent making it. (unless you just really love making baby booties... which i've done and can totally understand the appeal.)
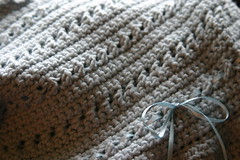
well, it's finished, so i think i did okay with that whole schedule/sizing thing. :) in fact, i started it during the opening ceremony of the olympics (remember that? weird how it already seems like ages ago) and finished it before the olympics ended. i wonder if other people do this or if i'm weird, but when i look at something i've made, i always remember what i was thinking or what was happening around me while i was working on it. thus, i'll always think of this as hazel's "olympics dress".
i was going to title the post that way, but i figure that will just confuse the search engines. in fact, if anyone arrived here looking for patriotic, athletic-inspired clothing, i apologize. (but if you did, and you read this far anyway, leave a comment to say hi. because that's something i'd do... the internet is so distracting. :)
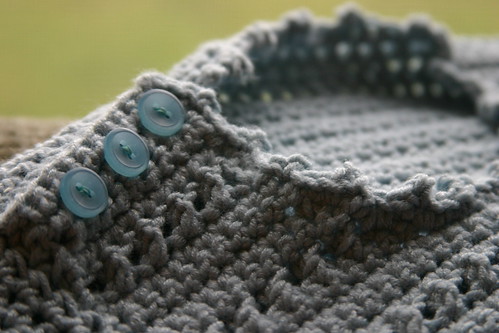
p.s. this is the second thing i've made out of bamboo blend yarn (the first was a springy sweater), and i'm really sold on it. it's easy to work with, has a lovely sheen, and works well for those of us in warm climates where wool isn't always the best option. this time, it was bamboo/nylon babyboo in color "blue ice" -- quite economical, too, at $5.50/skein. last time, it was wool bam boo (guess what it's made of?), and after washing it a ton, i can attest that it really holds up well.